
HOW TO MAKE A BOOMERANG ?
HOW TO MAKE YOUR OWN BOOMERANG?
This section aims to provide you with initial advice for making your own boomerangs. The we’ll explore in more detail how to correct the first defects. However, remember that nothing beats field testing!
Basic Steps regarding Boomerang conception
To begin, let’s analyze the following three points:
-
Anatomy of a Boomerang
-
Rough Cutting
-
Finishing Touches
You’ll then choose your material to build the boomerang of your dreams.
Finally, you’ll make a number of corrections and finish with an original decoration.
To go even further: make adjustments like the pros!
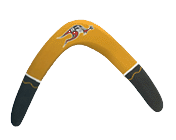
Anatomy of a Boomerang
A boomerang consists of 2 or more blades profiled like airplane wings. They are connected by the elbow. Depending on the direction of rotation, one edge will “attack” the air, while the other will let it “escape”:

anatomy of the boomerang
Leading Edge and Trailing Edge:
-
-
The upper face, called the upper surface, is the one that will be on the inside of the trajectory.
-
The lower face, called the lower surface, which is always flat (or nearly so), will be on the outside of the trajectory.
-
IMPORTANT : A right-handed boomerang rotates counterclockwise, while a left-handed boomerang rotates clockwise !
Rough Cutting your Boomerang
Before starting, gather the equipment you’ll need:
-
Wooden board
-
Jigsaw (for rough cutting)
-
Wood rasp (or electric sander)
-
Clamps
-
Sandpaper (of various thicknesses, up to very fine)
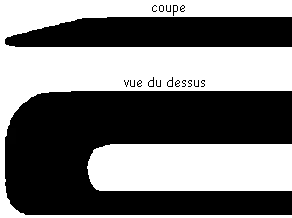
Orient the wooden board so that the top of the boomerang is slightly concave. Once the shape of the boomerang is traced from a plan, you can cut it roughly with the jigsaw.
Then refine the cut using a rasp or an electric sander like a file. Be sure to note which are the leading edges and trailing edges!
-
Leading Edge: Small (a few mm)
-
Trailing Edge: Occupies between one-third and half of the blade’s width
rough-cutting the boomerang
The bottom of the boomerang remains flat (for now: see First Corrections).
finishing touches of the Boomerang
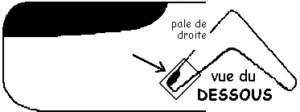
Finishing Touches
Long work with sandpaper is necessary, starting from coarse grains to very fine paper, to smooth out sanding irregularities. For this, the lines formed by the plywood folds indicate the regularity of the work:
Don’t hesitate to spend time with very fine sandpaper, as the boomerang in flight is sensitive to surface irregularities.
Corrections : How to adjust the Boomerang to your ideal flight
A boomerang is rarely successful on the first try. You need to test and adjust the boomerang accordingly.
Choose a time when the wind is light or non-existent to do your tests. Be careful to throw it correctly so as not to attribute a bad return to the design.
Here are some tips that can help you (they are always intended for a right-hander: a left-hander will reverse right and left).
The boomerang makes a one-way trip :
Accentuate the sanding of the leading and trailing edges.
It starts to come back but it’s still too far:
Maybe you can still sand it a bit. If not, it’s a bit heavy for its shape. Keep it for strong winds!
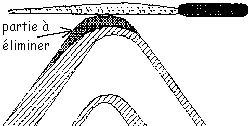
It always comes back to the left:
Make a bevel under the right blade on the leading edge side.
sanding of the boomerang
Impossible to make it take off: it crashes:
Check that it’s flat. You can try to straighten a blade, but go slowly!
correction of the take off of the Boomerang
It doesn’t glide enough on return:
Lightly sand the underside of the leading edges.

glide influence on the Boomerang
- surface A affects glide and return
- surface B can interfere with elevation and affects rotation ability
- surface C affects glide
Conclusion
May these few tips be enough for you to create the boomerang of your dreams…
Know that you need to be patient and that progress is made by trial and error, through repeated attempts.
Finally, adjustments vary from one shape to another!